


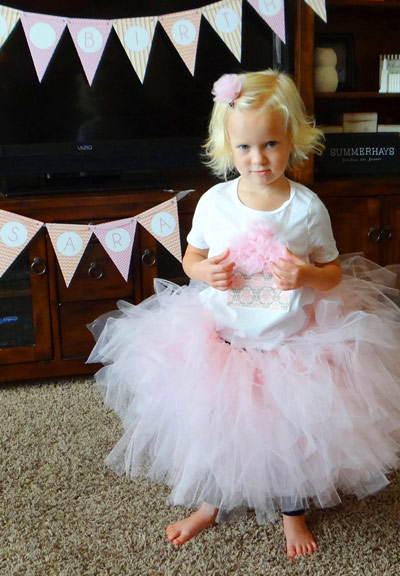
How to Make a Baby Tutu


As a mom to 3 boys, I hardly ever get to make anything dressy and girly. I think that is why I go all out for the cute baby girls being born to my friends. Recently I have been making baby tutus as baby shower gifts. I just adore them! They are a perfect gift to bring to a baby shower.
I am going to show you how to make a no-sew tie on version. It is really easy to make and the knots hold really well. I have never had any come undone.
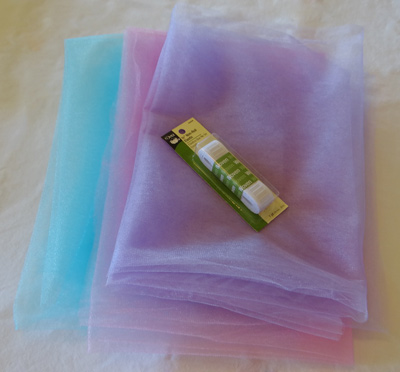
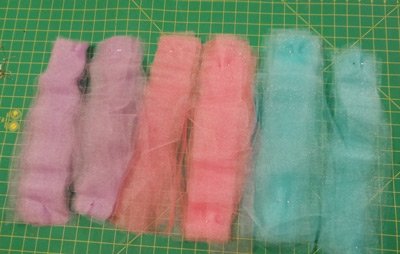
The great thing is that there are so many beautiful colors of tulle to mix and match. Did you know they have sparkle tulle and tulle with glitter? How cool is that?!
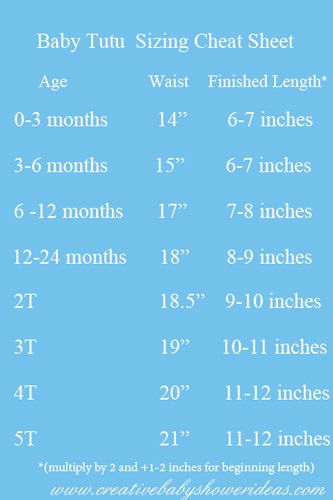
I made a general sizing chart for you to help you figure out how big you want the waist and length for your tutu. I was making one for a baby 3 months old so I went with a 14 inch waist on the elastic. I have found that the elastic stretches as you add tulle, so going a little smaller on the waist will help. Babies come in all sizes so use it as a rule of thumb and not a strict guideline. ;)

***Note: You can buy Tulle by the bolt or on a roll. Both varieties work great to make a tutu, but the method of cutting is slightly different with them. My local craft stores are very limited on the colors they sell by roll, so most of the time I use tulle by the bolt. I will show you instructions on how to cut both kinds of tulle.***
You Will Need:
- Non roll elastic- for this tutu, I used 3/4 inch wide.
- Tulle- for this tutu, I used 3 colors: lavender, pink sachet and blue.
(I used approx. 1 3/4 yards of bolt material for each color.)
Make Your Baby Tutu: Cutting by the Bolt Material
Getting the most cuts out of your tulle might require some math. In this example, my material was 54 inches wide off the bolt. I wanted my strips each to be 16 inches long. So I decided fold the tulle so I could get long strips 3 inches wide, then I would cut those strips into 16 inch long pieces.
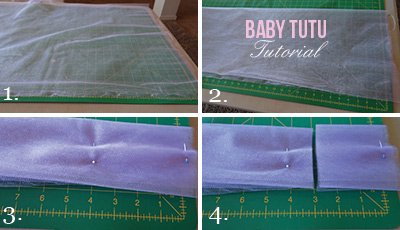

- Lay your material out flat in front of you. Leave the top fold from the bolt in place (mine is on the top with the open end on the bottom). Line up the bottom edges. I pinned it in place to make it easier.
- Fold the material down towards the open end.
- Fold again and pin to hold in place.
- Cut every 3 inches to get long strips that are 3 inches wide.
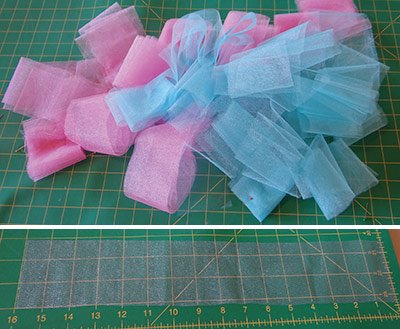
I continued doing this until I had cut through all 3 colors of material. Once I had done that, I opened each long strip and cut it into 16 inch strips. I was able to get 3 strips out of each cut.
Here is my final pile of strips ready to be tied onto the tutu.
Make Your Baby Tutu: Cutting By the Roll
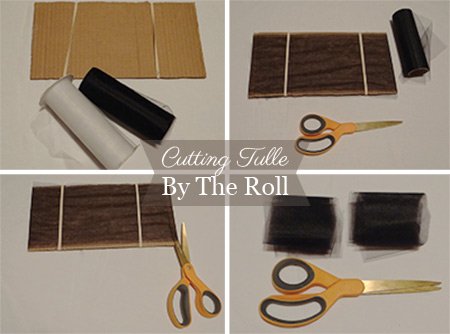
- You will need a cardboard cut to the size you are cutting the tulle. It needs to be at least 6 inches wide (but it can be wider). You will also need 2 rubber bands, scissors and the tulle you are using.
- Wrap the tulle around the cardboard, and continue to wrap until you have the amount you want to use. Place the rubberbands over the tulle to hold it in place.
- Using your scissors, cut the tulle on each end of the cardboard.
- Remove the tulle from the cardboard and fold in half over and over until it is small and manageable. Cut the width in half. This will give you strips that are 3 inches wide to use for your tutu.
Make Your Baby Tutu: Sewing the Elastic Waistband
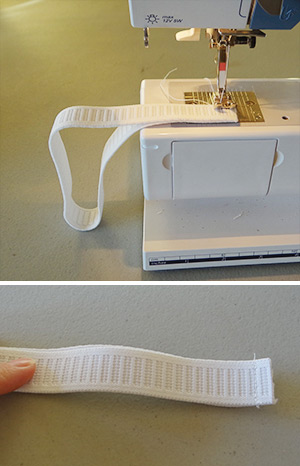
Measure and cut your elastic to size. If you have a sewing machine, run it through with a straight stitch. I reversed the stitch on the ends for a good hold. If you don't have a sewing machine, you can hand stitch the ends together.
Make Your Baby Tutu: Tying the Tulle On

Find a container that matches the size of your elastic. I used a pitcher for mine. You can also place it around your thigh if you don't have anything readily available to use. Gather your strips together. I used 4 strips of tulle for each knot. Fold it in half and place the center loop under the elastic facing downwards.
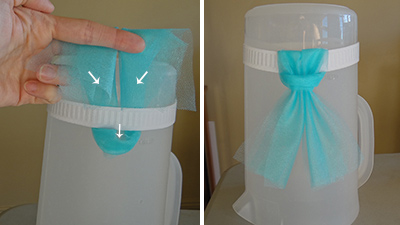

Now fold the ends downward and push them through the loop and pull. Wala a knot!
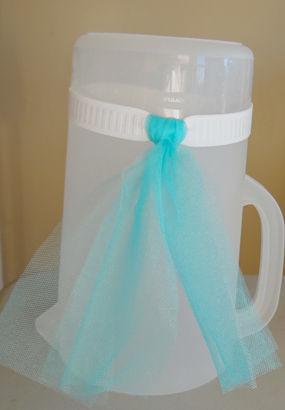
Pull to tighten.
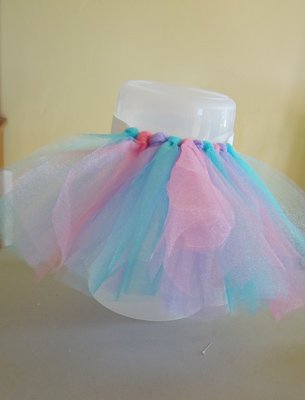
Continue to work around the elastic until you have filled all the spaces. For this tutu I did a pattern of purple, pink and blue. I did one knot of each color. At the end, I had 16 knots of each color.
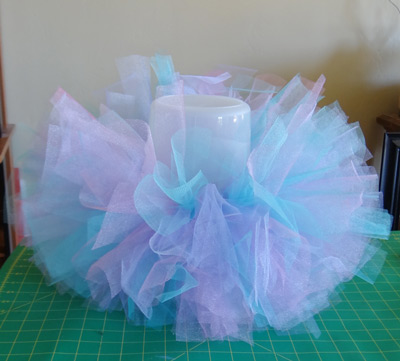

Fluff to get maximum cuteness!


This tutu was made with white, black and glitter fushia tulle. It was also a 3 months size. I used 1/2 inch thick non roll elastic. The white and black were tulle on a roll and the fushia was on a bolt. I did 4 layers of tulle in each knot. I cut each tulle strip to 12 inches long. The pattern was 4 fushia knots, 4 black knots, and 4 white knots. I ended up with 4 sections of each color. I matched it with a felt appliqued onesie for an adorable baby gift!

I made this for my neighbor's adorable little girl. It has a TON of tulle on it. I used the crocheted headband material for the waistband. I sewed the elastic waist at 16" wide but it ended up being a little big on her. There were 3 different shades of pink tulle mixed in and the strips were cut to 24 inches long. I probably ended up using about 3 yards of each color.
With the crochet elastic, you can layer 2 to 3 layers of tulle knots. I also made her shirt and tulle hairclip. ;)
Make Your Baby Tutu: Using Crocheted Elastic For Your Waistband
This method works for both the crocheted elastic you can buy on the roll or the crocheted tube tops.
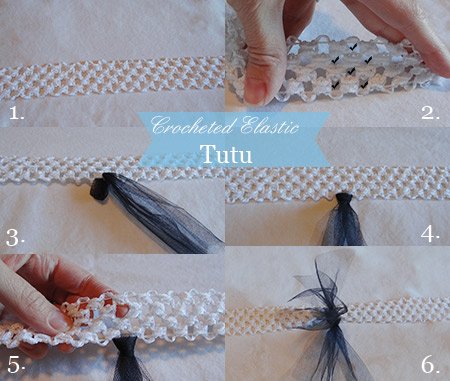

- I used crocheted elastic on a roll. Cut the elastic to the waist length. Using your sewing machine, you will want to do a zig zag stich to hold the ends in place and allow it to stretch.
- The holes are fairly small, but when I stretch it, you can see the holes we are going to be using for the tulle. You want to use the first hole on the bottom for your first knot. Then you will use the hole above it to stack the next knot. This will make it really fluffy. ;)
- Gather your strips of tulle. Each hole will be getting 2 strips of tulle. Fold your strips in half and push the center through the first hole.
- Now fold the ends down and pull them through the loop you created and pull to create the knot. (Just like in the instructions above.)
- The next knot will be made in the hole above it (where my finger is sticking through).
- Repeat the steps above to make the next knot. That's it! Continue around the elastic until you have filled all of the holes.
I hope you enjoyed this baby tutu tutorial and it will give you some great ideas for your baby shower gift. We would love to see your finished photos! You can send them to us here.


New! Comments
Have your say about what you just read! Leave me a comment in the box below.