


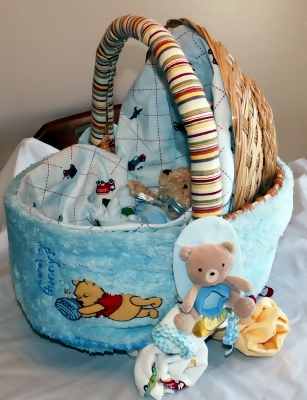
Baby Basket Carriage Craft Idea
This Baby Basket Carriage was featured on Good Things Utah, the morning show for ABC 4 in Salt Lake City, Utah
You can see the write up of this craft from the show here.
Items needed:
- 1 medium basket with a handle
- 1 small basket without a handle
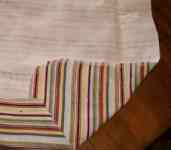
- 4-5 receiving blankets
- 1 bottle of baby lotion (the rounder the better)
- 1 bottle of baby wash (the rounder the better)
- 1 roll of ribbon
- 1 plush blanket
- 1 pair of baby booties
- 1 doll or teddy bear
- 2 washcloths
- 4 clear rubber bands
- 2 pipe cleaners
You will also need:
- Baby items to decorate with
- Safety pins
- Straight pins
- Double sided sticky tape
- Scissors
How to Make a Basket Carriage Gift
Covering the Basket Sides:
Take your plush blanket and fold it to the approximate width of the basket. The blanket should be able to wrap around the blanket once and touch lightly with one seam. Use safety pins along the seam to hold the blanket together. Then take double sided sticky tape and tape the blanket to the basket so that the blanket slightly covers the edge.
Cover the seam by tying a washcloth over the safety pins and decorate with baby items.
Assembling the Wheels:
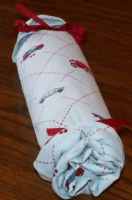
Start by folding a receiving blanket so that it is slightly wider than the baby lotion. Roll the blanket around the lotion. Use 2 rubber bands to tie the ends of the receiving blankets. Tie a ribbon on each side to finish off. Repeat the same process with the baby wash. To attach the wheels to the basket you will thread your 2 pipe cleaners through the bottom weave of your basket.
(If the weave is too tight, you might need to use a craft wire instead.) Twist each pipe cleaner around the wheels to secure them to the basket.
Roll the edges upwards so that the wheels look like rosettes.
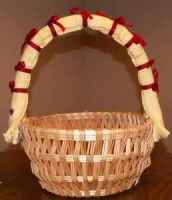
Cover the handle of your basket by taking 1 receiving blanket and folding it lengthwise so it is slightly larger than the width of the handle.
Cut 9 equal ribbons and tie bows along the handle to hold the blanket in place. Turn the blanket to make sure the seam is facing the back of the basket.
Cover the edges of where the blanket meets the basket by pinning your baby booties on top of the blanket.
Take your smaller basket and place it inside the larger basket on its side. This will become the canopy of your baby carriage. If you would like to secure it to the basket you can use a glue gun or wire it with craft wire.
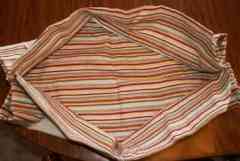
Lining the Inside of the carriage:
The size of your receiving blanket and baskets will determine how much fabric will be inside the carriage. This is the technique I came up with to get the smoothest look possible.
To line the canopy and inside of the carriage, lay a receiving blanket in front of you with the front design facing down. Fold the corners in and place a piece of double sided sticky tape on the inside edges. Fold the middle sections in to give all sides a flat edge.
Flip blanket over so the design is facing you and then fold over so the outside corners touch. Pin both outside corners in place.
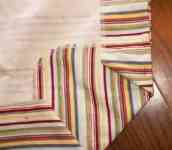
Turn the pinned corner on its side and bring the bottom of the loop formed by pinning up to meet the pin. Pin in place. It should look like a "T". Repeat on other side.
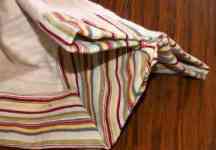
Set on table so the design faces up. Set up sides so it looks like a box.
Place the blanket inside the basket so the pinned sections match up to the basket handle. Attach the front of the blanket to the basket with double sided tape. Smooth the blanket inside the carriage and attach the blanket to the inside of the canopy by using double sided sticky tape.
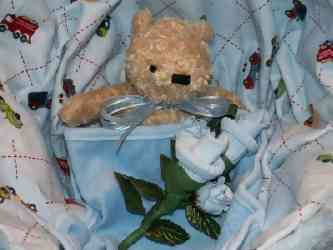
Place the doll or teddy bear inside the canopy of your basket carriage and cover with a washcloth.
Optional decorating techniques:
- You can also cover the back of the canopy with 1 more receiving blanket.
- Use lace or ruffles to cover the edges of the canopy and the basket.
- In place of a blanket on the handle you can use a onesie or a sleeper.
- Interchange the blankets with other baby clothing items to decorate the basket.
Return to Baby Shower Homepage


New! Comments
Have your say about what you just read! Leave me a comment in the box below.