


Picture Instructions on Making a Baby Sock Rose Centerpiece

Have you ever seen a baby sock rose bouquet? They are becoming a popular favorite at baby showers!
What woman does not like roses? There are not many that I can think of. But, what is better than receiving roses?
Receiving them in front of others!
I remember at the office every time valentine's or mother's day would roll around. It seemed one flower delivery guy would pass another on the way in or out of the building all day long.
Each woman would be casting jealous looks, hoping the next batch of flowers were for her.
A baby sock rose can not only make a beautiful flower arrangement to the mother, but it also gives her useful baby items for when her baby arrives.
The flower arrangement pictured here is my own design. I created the rosebud method, but I also have instructions listed for the open sock rose method that you can use for your bouquet.
The only warning I would give before proceeding with this project is the time factor. It does take a good amount of time to add the long stem to your rose.
But anything beautiful does take time! If you enlist some help from others you will be able to make this beautiful arrangement in a reasonable amount of time.
Things you will need:
- Vase- Make sure the opening on top is not too wide to hold your arrangement.
- Greenery- I like to use silk ferns. They resemble the real ferns but go well with the baby look.
- Baby's breath- I also use the silk version. It has a child look to it that goes well with the socks. The dried baby's breath will look dull next to the socks.
- 6 to 8 pairs of baby socks- one sock per rose. I used 8 pairs, which gave me 16 roses.
- Silk leaves (with the wire attachment)
- Floral wire- The thicker the wire, the better.
- Floral tape- Use the green color floral tape instead of black or tan
- Wire cutters
- Double sided tape
Steps to a beautiful sock rose bouquet!
Designing the roses
Sock colors- the colors of the socks will determine how the final rose looks. I like to use socks that are one solid color and as thin as possible. The athletic socks may be too thick to make a baby sock rose.
The sock color will determine the final look of your bouquet. You can use whatever sock color you wish. In this arrangement, I used 4 pairs of white socks and 4 pairs of pink socks.
There are 4 silk ferns used in this arrangement. Depending on the opening size of your vase and preference, you can use less.
Rolling the Socks
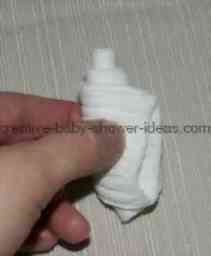
1. Lay the sock on a flat surface in front of you. Position the sock so the toe is pointing towards you and the opening is pointing away.

2. Start rolling the sock in a tight roll from the toe of the sock. Watch the edge as you roll, it will be forming the inside of the rosebud. If it does not roll to your desire and preference, re-roll.

3. Roll the sock all the way to the opening on the other end. Use double sided tape to attach both ends together.
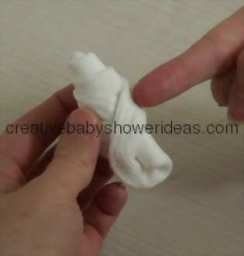
4. Take the bottom of the sock, away from the rosebud top, and roll up towards the rosebud. You will be forming the outside ridges this way. Make sure that you leave the inside of the bottom section unrolled.
As you roll it upward, around the sock, it will cause 2 sections of the edging to be exposed. Pull the sock over the exposed edges and secure with double sided tape. (It is harder to explain than it is to do.)
~ Baby Sock Rose Bouquet~
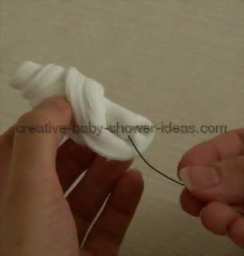
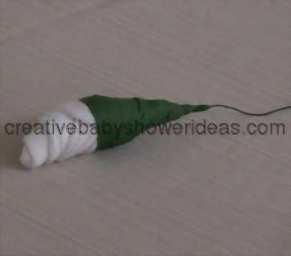
Attaching the wire
- Unravel the wire to the length you desire the long stem rose to be. Cut the wire. If you are incorrect, you can always add more wire later.
- Stick the wire through the opening of the material left at the bottom of the rosebud. I put it through the center most roll. Push it up the center of the rose as far as it will go. Be careful not to damage the sock. I like to turn the sock as I am threading the wire to help it go further.
~ Baby Sock Rose Bouquet~
Using floral tape around the rosebud
Floral tape will not stick to the material until it is stretched. Stretch the floral tape as you go. The color will change to a lighter green as you stretch it.
1. Cut the floral tape about the width of your shoulders. If you need more, you can add it as you go.
2. Place the floral tape at the base of the V-cross over or at the most attractive point of the rose. Anything above the tape will form your rosebud.
3. Wrap the 1st line twice to cover the edging of the tape.
4. Continue to wrap the tape around the rose towards the base of the rose. I like to overlap the tape, only going down about 1/16 of an inch so that it does not come apart around the curves.
5. Periodically make sure the wire is not coming out of the bottom of the rose. Make sure it is snug or you will have to re-wrap the rose.
6. When you reach the section where the wire and rose meet, wrap the tape a few times around the wire and twist it until it is snug.
~ Baby Sock Rose Bouquet~
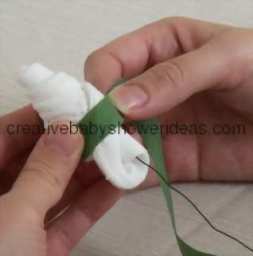
Attaching the stems
1. Measure down about an inch to 1 1/2 below the insertion point of the wire.
2. Attach your stem to the wire by wrapping the leaf wire around the stem wire. Wrap it closely to the stem so the wire does not show.
3. Attach the second leaf slightly below in the same fashion.

~ Baby Sock Rose Bouquet~
Taking the floral tape down the stem:
This is the part that will take the most time when making the long stem rose.
1. Start by wrapping the floral tape over the base of the rose, over the original tape. This will help the stem connection to be more solid.

2. Stretch the tape as you wrap down the rose stem
3. When you get to the leaves form the tape around the leaves so there is no wire exposes at the point where the leaf attaches to the stem.
4. Continue to wrap the tape until you reach the bottom of your wire, or the point where you feel the stem is long enough.
This is what your rose should look like when you have finished wrapping the tape down the wire.

Arranging your flowers
Before you arrange your flowers, place the ferns and baby's breath in the vase to get a visual of where you would like to place the roses.
You might need to trim the heights of the greenery if they are significantly taller than your roses. Or you can twist a little more wire to the bottom of the back roses and tape them. The roses in the back will be slightly taller than the roses in the front.
You can bend the wire in each rose to turn it to the direction you would like it to face. Play with the baby's breath to get it positioned just right in between the roses.
If there are different colors of roses, make sure to sprinkle the color evenly to get a balanced look.
~ Baby Sock Rose Bouquet~ Adding that special touch
A little ribbon tied around the vase can add an extra touch of elegance and pull the whole arrangement together.
If your vase is see through, you might want to cover the stems with moss or glass beads. It is up to you whether you would like them to show or not.
Hopefully with these instructions, you will be able to make a beautiful baby sock rose bouquet for that special mommy! Be sure and share your pictures with the rest of us so we can admire your work!
Baby Sock Rose Bouquets Shared By Our Readers


~ Terry from Queen Creek, Arizona ~

This is a table setting I made for a friend at work. It has the sock roses as well as so paper crafting images I made using my CRICUT die cut machine. I hope you like it.
~ Stacy F. from Greenville, South Carolina ~


~ Baby Sock Bouquet submitted to gallery by: ~
~ Amanda B. from Grand Haven. MI ~

The sock roses and diaper cake were a conversation piece for guests and the Mom-to-Be loved them too! AND... I had a great time making the diaper cake. It was much easier to do than I expected.
~ Baby Sock Bouquet submitted to gallery by: ~
~ Maureen W. from Wappingers Falls, NY ~
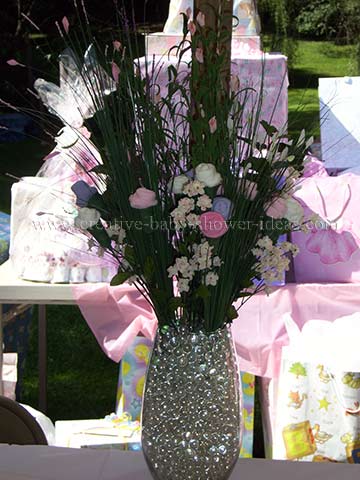
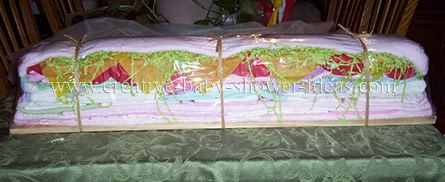
Great Floral Centerpiece for a baby shower! Also the Baby Wedge is a great gift filled with all the goodies a mom needs (bibs onesies, outfits, sleepers, bath towels, receiving blankets wash clothes, burp clothes, etc.).
~ Baby Sock Bouquet submitted to gallery by: ~
~ Nancy E. from Wappingers Falls, NY ~


I've included the Diaper Cake with the Baby Mickey and Baby Minnie on top of the cake since the Baby Shower was Neutral and since the Mother to be likes Mickey I came up with the Idea of printing these Disney Babies online and pasting them on Foam. I also included your idea of the bouquet roses in Neutral colors as well. The Baby Shower was a total hit once my cake arrived; everyone stood up to admire my work inspired by your website.
~ Baby Sock Bouquet submitted to gallery by: ~
~ Karen R. from Powell, TN ~

I made a Small bouquet of sock and washcloth flowers, wrapped them in matching fabric and tied a bow around them.
~ Baby Sock Bouquet submitted to gallery by: ~
~ Ashley C. from Fayetteville, North Carolina ~


~ Baby Sock Bouquet submitted to gallery by: ~
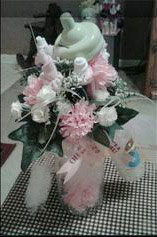
~ Debra B. from Brownsburg, In ~

This is made of sock roses, ababy bottle, a bank and brush cleaner.


New! Comments
Have your say about what you just read! Leave me a comment in the box below.