


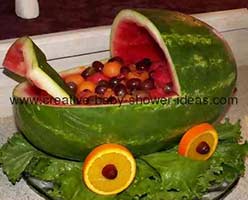
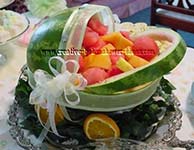
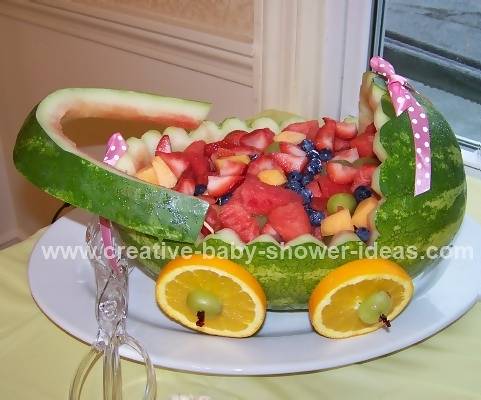
A Watermelon Baby Carriage

A watermelon baby carriage is a creative (and delicious) way to dress up your food table.
No need to break a diet for this centerpiece! It is all healthy!
Did you know that a watermelon baby carriage is easy and quick to make?
The common misconception about this creative centerpiece is that it is difficult to make and requires expensive tools.
Although fancy tools are fun to use and do give the look a nice touch, they are not necessary to make this centerpiece.
There are a few things to know before starting this baby shower craft:
- Timing is of the essence. The watermelon baby carriage should be made the day of or night before the baby shower. The melon rind will start to dry out and harden if made too far in advance.
- Refrigeration helps the watermelon from over ripening. Of course, the end result will depend on the condition of the watermelon when it was purchased. But to be safe, purchase it within a day or two of the baby shower and keep it refrigerated until you are ready to carve it.
- The fruit salad has a tendency to lose its water holding capabilities the longer it is sitting. The result can be a build-up of juice at the bottom of the fruit salad. It can make it so your guests don't want to venture into the water to find the fruit at the bottom.
Take care of this problem by providing "weep holes" or slits at the bottom of the watermelon for the water to run out. This keeps your fruit high and dry out of percolating water. Simply place the watermelon over a tray or dish that can hold the water and cover with ice and decorations.
I will show you how easy it is to make a watermelon baby carriage. Step by step, picture by picture. These picture instructions should help to clear up any confusion you might have about making this craft.
If you are still a little confused...use the contact us form on the left and send me an email. I will do my best to help you complete your masterpiece!
Note: I am creating a basic watermelon baby carriage that is easy to make and follow. Use your creative flair to make it fancy and give it style!
Start with a watermelon that is big enough that you can picture it as a baby carriage. Not too long and not too short.
Look it over to make sure there is no cracks, holes, or leaking. The shell should not feel soft or gushy. Once you have selected your watermelon you are ready to begin.

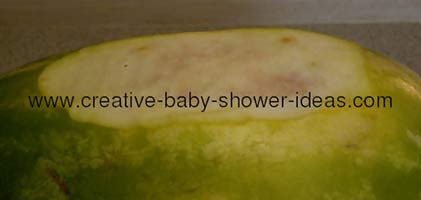
Make a flat bottom surface:
Watermelons are known for rolling around. You do not want that to happen at the party! Take a knife and shave a flat spot on the bottom of the watermelon. Be careful not to venture beyond the white inner layer. This layer is all that holds the fruit inside.
If you accidentally cut into the pink, don't junk the watermelon yet! As long as the hole is not humongous you can use it as a weep hole to drain the watermelon juice.
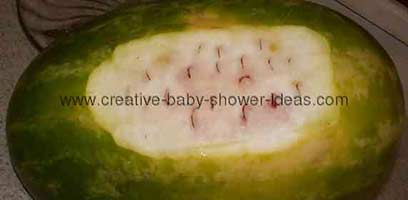
Create your weep holes:
Take a knife or toothpick and puncture holes into the bottom layer to create the weep holes for the watermelon juice.
Cut your design into the watermelon
*(see option if you have fancy knives)
Use a knife to cut the shape of the carriage hood and sides. You will not need to cut in very deep because the skin is so thin. The sides of the carriage will be slightly under the halfway mark.
The hood can be a little past than the middle point to give yourself a little room for error. You can always shave a little off if it does not look right.

* If you have fancy knives, you can cut a jagged edge along the watermelon instead of a straight edge. You could also do a fancy lace design along the edge to give it a refined look.
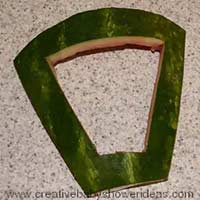
Option for the carriage handle:
You can create a carriage handle out of the portion of the shell you cut out. This is the general shape of the handle. Once you remove the shell from the watermelon, you can carve this shape into it.
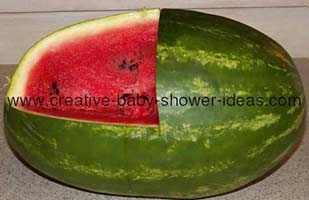
Removing the shell:
For demonstration purposes, I cut the shell in half to show you how it looks as I remove it. If you are making the handle, just use your knife to cut through the watermelon and remove the shell.
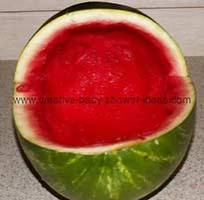
Scoop out the watermelon
Scoop out the watermelon in the baby carriage and transfer it into another container. The inside should look like this.
Place the watermelon into the dish:
Place the watermelon on the serving dish or basin it will be displayed on. Depending how far you are from the serving time would depend on whether you would add ice at this point or refrigerate the watermelon.
If you are refrigerating the watermelon baby carriage, cover with plastic wrap so it doesn't dry out.
Make your fruit salad:
Mix the watermelon with other fruit to create a fruit salad. Fruit that would work well in the salad would be cantaloupe, honeydew melon, grapes, and strawberries.
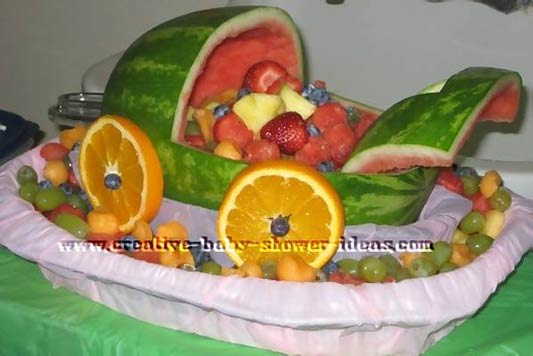
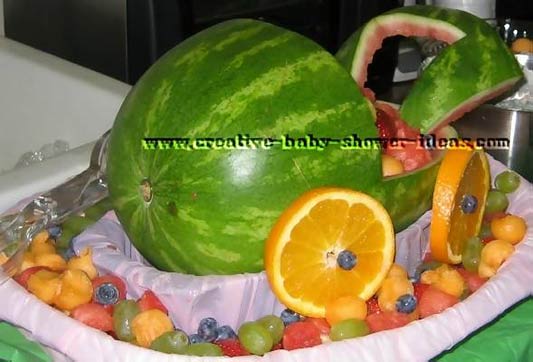
Create the wheels:
Create the wheels for your watermelon using oranges. Slice the oranges anywhere between 1/2 inch to an inch thick. Attach the wheels to the watermelon using toothpicks.
To create the hubcap you can use a melon ball, cherry or grape. Stick the melon ball, cherry, or grape onto the toothpick so the rounded edge is showing and the toothpick is covered.
The final garnishments:
Use lettuce, leftover fruit and other edible items to create the final effect.
Here it is!
You can also match your watermelon to match your baby shower theme. Here is a Noah's ark watermelon centerpiece that was used to go with a twins baby shower theme.

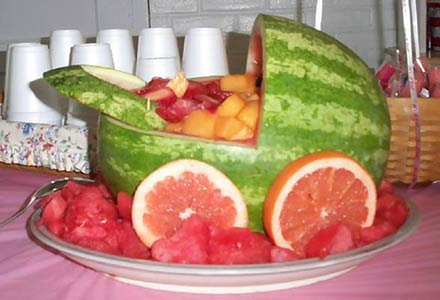
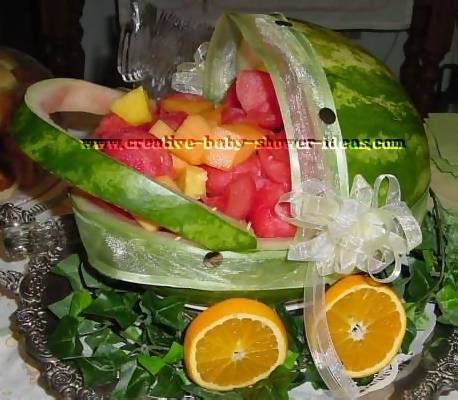
Watermelon Baby Carriages Submitted By Our Readers:


Carriage photo submitted to cake gallery by:
~ Rosanne from Holly, Michigan ~
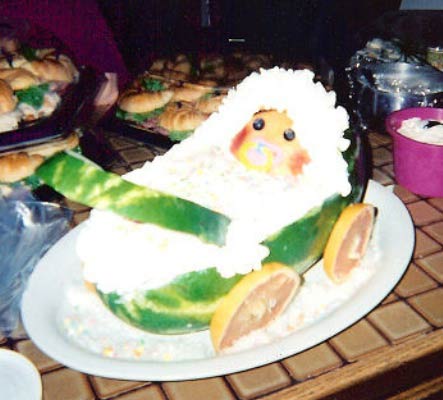
This attached picture is an "adaption" of the standard Baby Carriage Fruit Bowl I made for my daughter-in-laws baby shower. The "Baby's" face is a honeydew melon cut in half. I used blueberries for the eyes, put food coloring on the "cheeks" and used a real pacifier in the Baby's mouth. I put cool whip over the fruit and around the head of the Baby, to make it look like a bonnet and blanket, then sprinkled the blanket with pink, blue and yellow sprinkles. Thanks for the great web site!
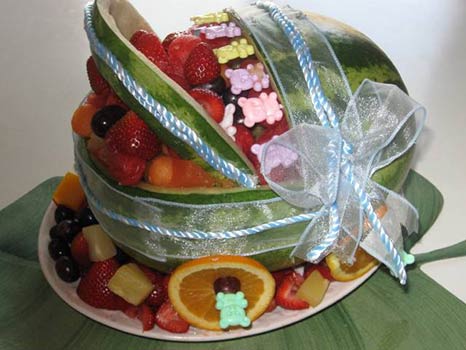
Carriage photo submitted to cake gallery by:
~ Nicole D. from Newburgh, New York ~
Thank you so much for having this site, I got so many great ideas! I have made the watermelon baby carriage this past weekend and it was a total hit! I also made a mini hot air balloon decoration. It was VERY VERY simple to make. I have included a photo showing the finished product.

Top of Page
Carriage photo submitted to cake gallery by:
~ Deana A. from Whitehouse, Texas ~

Top of Page
Carriage photo submitted to cake gallery by:
~ Chelsey G. from Blytheville, AR ~
I was a co-hostess at a shower at my place of employment. I volunteered to make the fruit basket and the diaper cake. I have pictures of both. Have made diaper cakes before but I got my fruit basket instructions from your website.
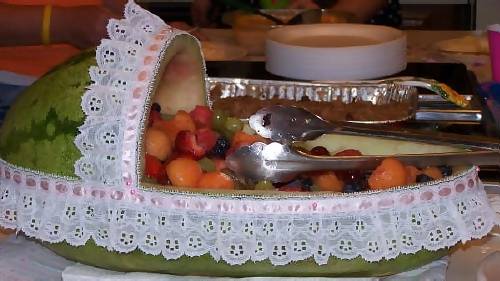
Carriage photo submitted to cake gallery by:
~ Debbie W. from Houston, TX ~
Attached are two photos of our version of the watermelon carriage that we made from the instructions found on your site. We added the bows on the side and delicate ribbon around the edges. We secured the handle in place with toothpicks. I was so pleased and it was the hit of the shower.
Carriage photo submitted to cake gallery by:
~ Joyce K. from Aurora, Colorado ~
This is the baby carriage I did for a baby shower.
Carriage photo submitted to cake gallery by:
~Submitted by: Yvonne R. of Attleboro, MA ~
We threw a Ducky themed baby shower for my youngest daughter and used Blow up rubber duckies on the tables as centerpieces. I made a baby buggy watermelon fruit salad, and her sister created a "baby tree"! .


New! Comments
Have your say about what you just read! Leave me a comment in the box below.